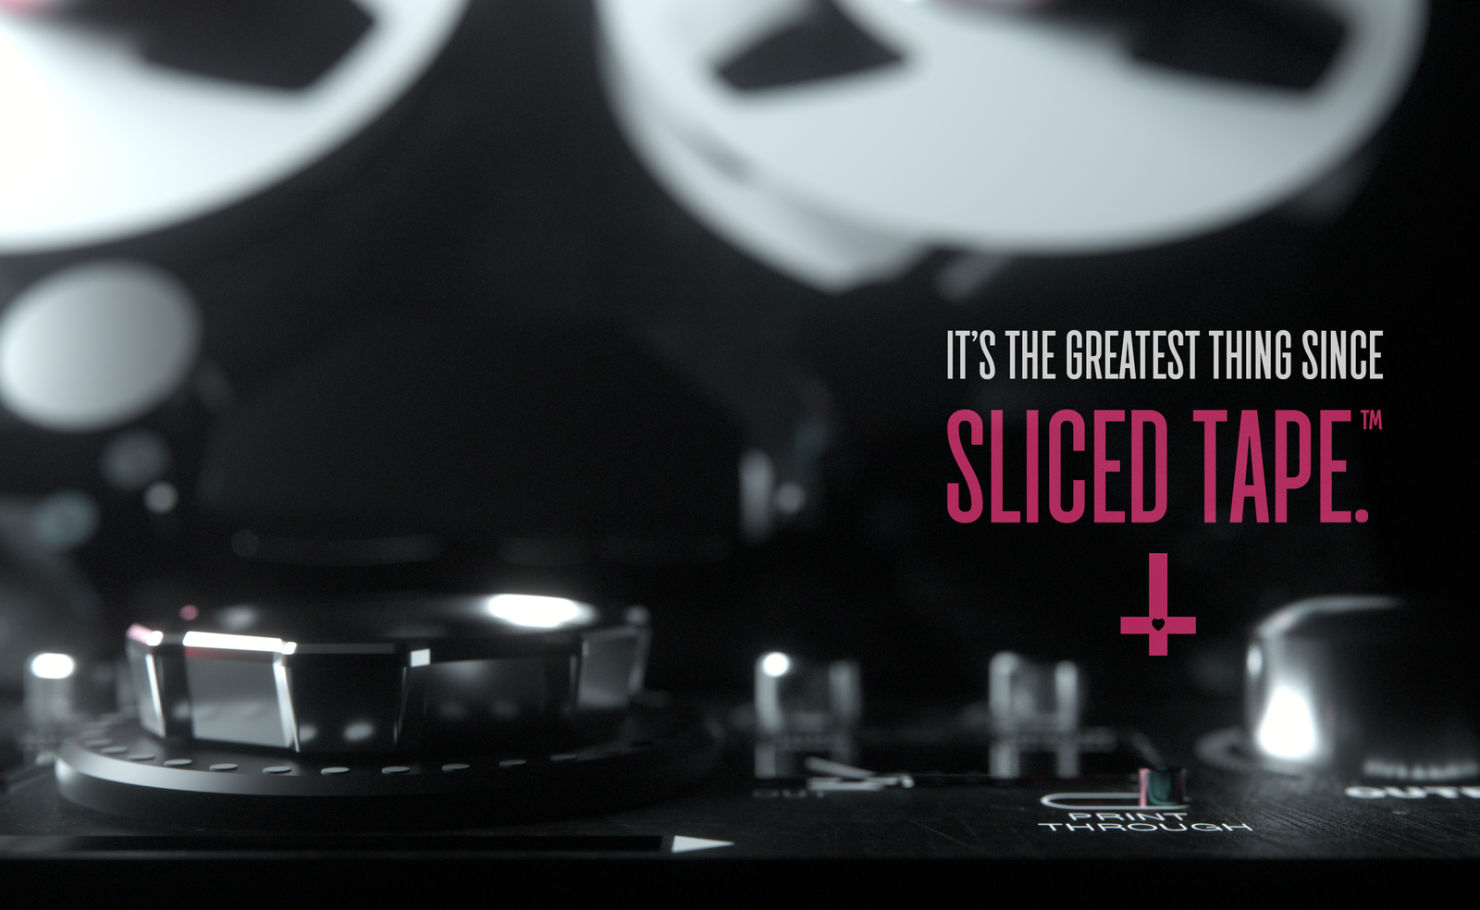
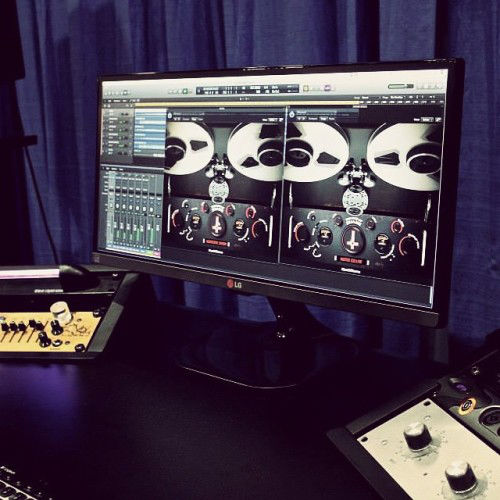
The Kiss of Shame
An old magnetic tape emulation plug-in brought back to life.
Recently I was donated the source code to The Kiss of Shame, a magnetic tape emulation plug-in from 2014, originally developed by Eros Marcello and friends. The plug-in was never finished or released, but Eros has graciously allowed it to become open source.
As part of my plug-in archeology project, I’ve been hacking away at the code to get it up and running again. In this blog post I’ll explain in detail how this plug-in works.
“TKOS” was originally written using JUCE 3, so I updated it to JUCE 7, cleaned it up a little, and added some missing functionality.
You can grab the code and binaries from GitHub.
About the plug-in
The Kiss of Shame was one of the first analog tape degradation simulations. Quoting from a LinkedIn post by the original author:
It’s the worlds first (and to my knowledge) only tape / analog circuitry emulation plugin that realistically models the effects of magnetic particle instability, lubricant loss, substrate deformation, drift, scrape-flutter, print-through and reel expansion/contraction into a suite of FX processing tools for sound design and music production. We were also the first to leverage machine learning to account for the vast nonlinearities inherent in magnetic tape and analog circuitry.
I don’t know how much of that actually got implemented — I’m not an expert on reel-to-reel tape recorders — but it’s an interesting plug-in nonetheless. 😃
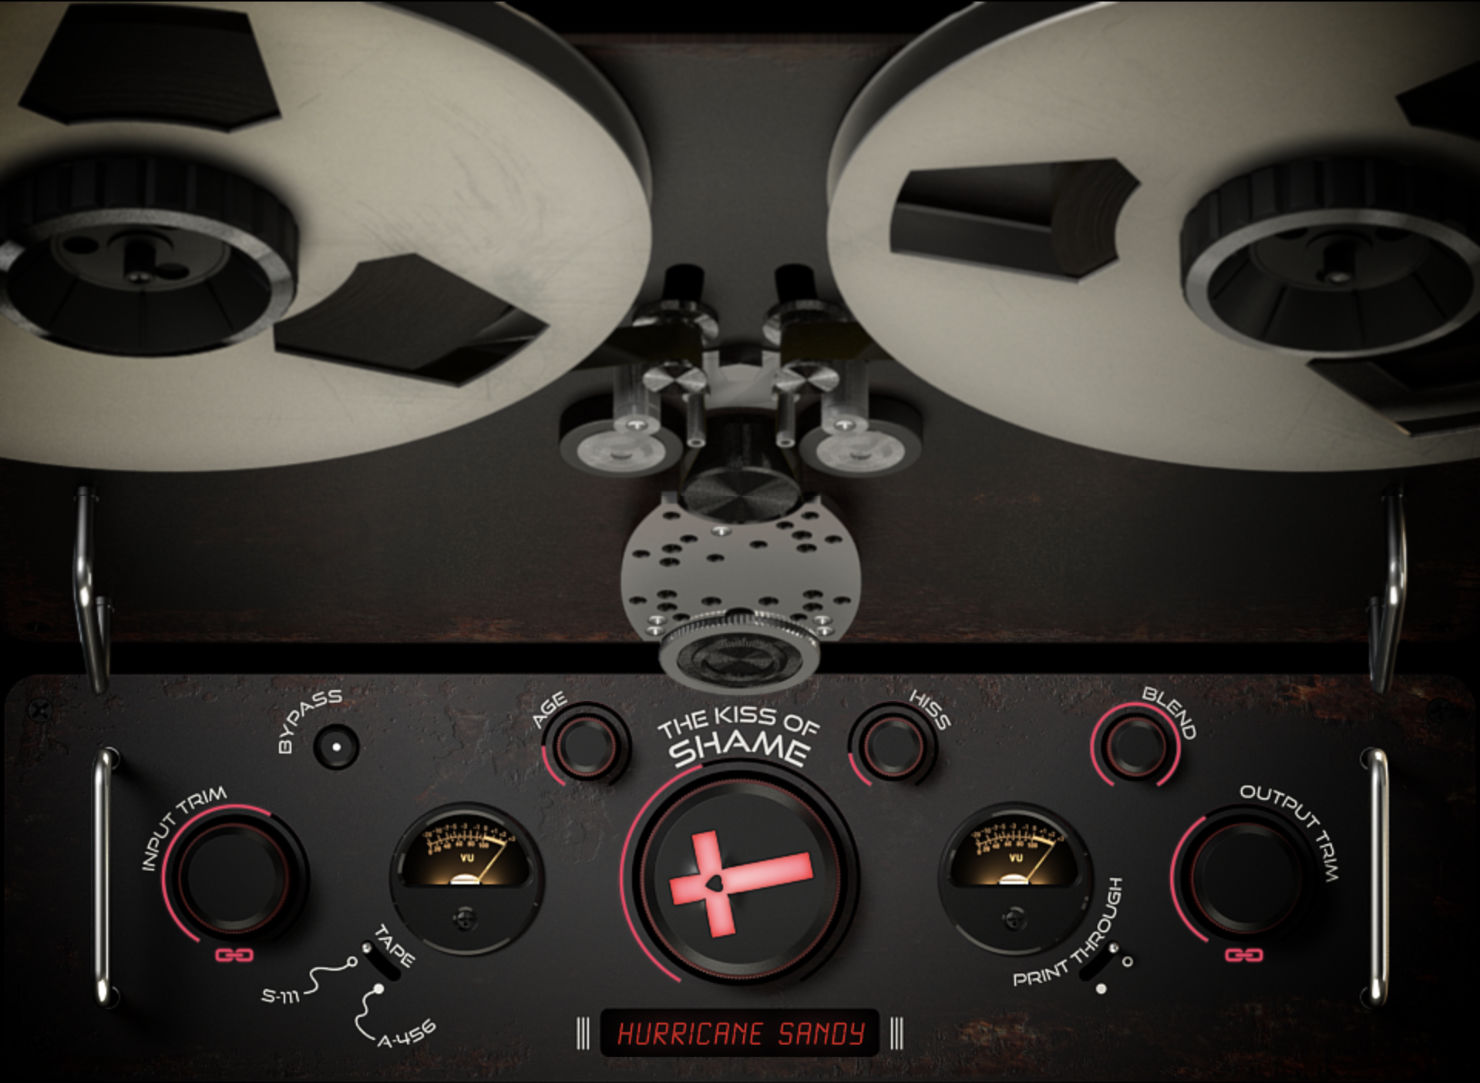
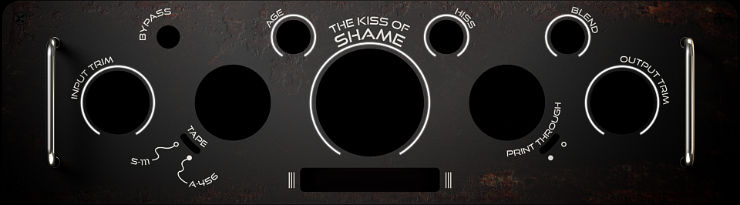
The Kiss of Shame has the following knobs and buttons:
Input Trim – Adds odd and even harmonics to the input signal.
Environment – Choose between several simulated storage conditions to inflict the sonic ramifications of factors such as magnetic particle instability, oxidation, lubricant loss, tape pack expansion/contraction, “vinegar syndrome” and more upon the source material.
Currently only the Hurricane Sandy environment is implemented, modeled from tape immersed and then recovered from the storm’s flood waters.
Age – The amount of hypothetical time the tape has been subjected to the chosen “Environment”, allowing the user to manipulate the severity of the corresponding effects.
Shame – The Kiss of Shame recreates the full spectrum of factors like Drift, Wow, Flutter and Scrape-Flutter which the user can impart with the center knob. It can take your source signal from mildly colored to totally mangled.
Hiss – Adds a subtle layer of noise to the sound.
Blend – A standard dry/wet mix control. Turn this up!
Output Trim – For gaining down the output when everything becomes a bit too loud.
The Link button below the trim knobs ties together the input and output gain, so that turning one knob will move the other knob in the opposite direction.
Bypass – Disable the effect.
Reach out and touch tape – The Kiss of Shame features animated, interactive reels that can be manipulated with a simple click or touch. This allows users to access authentic analogue tape flange in real-time, without the need for two physical tape decks, and in a fraction of the time.
All parameters, including reel movements, are fully automatable, and for screen real estate optimization, the reels are collapsible and fully customizable.
There are also some controls that are not functional:
Choose between two distinct tape types:
- S-111: A superior reel format popular from the 50s to 70s, was the preferred reference tape for many engineers.
- A-456: This classic, high-output/low-noise format is a recording staple used in countless productions.
Print-Through – Also known as “bleed-through”, this emulation captures the mechanical speed fluctuations present in analog recordings. While they posed challenges for engineers in the past, they became a hallmark of classic records.
The parameters
In the original code, the parameter system was unfinished: parameters were not exposed to the host and would get reset whenever you (re)opened the editor. Of course, those were the JUCE 3 days, when JUCE did not have the AudioProcessorValueTreeState yet. I ripped out all that old parameter code and replaced it with an APVTS.
The plug-in has the following AudioParameterFloat parameters, corresponding to the various knobs in the user interface:
- Input
- Output
- Shame
- Age
- Hiss
- Blend
- Flange
The Input Trim and Output Trim controls range from –18 dB to +18 dB, all others are 0% to 100%. Internally, the parameters are simply float values between 0.0 and 1.0. There is no knob for the Flange parameter; the flange amount is set by dragging the mouse on the reels, as if you’re touching them with your finger.
The following are AudioParameterBool parameters:
- Bypass
- Link
- Show Reels
- Print-Through
The Show Reels parameter is toggled by double-clicking anywhere on the front plate of the tape recorder to hide or show the reels. This is just a UI thing, it has no effect on the sound.
Finally, there are two AudioParameterChoice parameters:
- Environment
- Tape Type
The parameters are managed by a separate Parameters class. None of the parameters are smoothed, so you’ll hear zipper noise when turning the knobs.
Note: The Print-Through and Tape Type parameters are not actually used for anything. I only included them for completeness’ sake.
The audio graph
The main class that processes the audio is AudioGraph. It has a processGraph() method that’s called from the audio processor’s processBlock.
There are two other small things that processBlock does: It measures the RMS level over the current buffer (used for drawing the VU meters) and it reads the playhead to determine if audio is currently playing (in which case the tape reels should be animated). But all the real work happens in AudioGraph.
The AudioGraph does the following things in order:
- Apply gain to the input audio buffer.
- Copy the audio into a second buffer. The next steps work on this copy.
- Apply input saturation.
- Process the flange effect.
- Do the Hurricane Sandy environment effect, if enabled.
- Add a subtle hiss.
- Do the Shame feature.
- Mix the processed audio with the original.
- Apply output gain.
The gain that is applied in steps 1 and 9 is a simple buffer.applyGain() operation.
The dry/wet mix from step 8 is handled by a Blend class and performs a simple linear interpolation between the wet and dry signals. The further the Blend knob is turned, the more wet signal and the less dry signal is used. Like so:
output[i] = (1.0f - blend) * dry[i] + blend * wet[i];
The other steps are way more interesting, so let’s look at them in turn. These modify only the wet signal (i.e. they work on the copy of the input buffer).
Note: A quick note about how parameter values are read from the APVTS and used by AudioGraph. The Parameters class has an update() function. This is called at the start of every processBlock and reads the current values from the AudioParameterFloat objects. At the top of processGraph it uses these values to configure the DSP objects. For example, for Blend it does blend.setBlendLevel(params.blend); There are other, possibly more efficient ways to do this, but this method is simple and I like it.
Input saturation
The first “proper” audio processing stage is input saturation, performed by a class named, you’ll never guess it… InputSaturation.
The InputSaturation class has methods for setting the drive, threshold, output level, etc, but these methods are never called. The drive, satThreshold, and output variables have default values that effectively turn these features off. I kept them in the code but they serve no function in this particular plug-in.
Instead, the input signal is simply amplified by the Input Trim knob. In the code this knob has the slightly misleading name inputSaturationKnob, but it doesn’t change any of the saturator’s properties. It merely sets the gain of the signal going into the saturation stage.
The processInputSaturation() method does the following:
- Make a copy of the input signal.
- Perform odd harmonic waveshaping on the input signal.
- Perform even harmonic waveshaping on the copy.
- Mix the odd and even harmonic signals.
- Apply a simple low-pass filter with a 4 kHz cutoff point.
The odd harmonic waveshaping happens in processOddHarmonicWaveshaping(). The code in this method looks a little complex but since the threshold is always 0.0 and the drive and output level variables are always 1.0, the logic simplifies to:
y = tanh(2.0f * x)
It takes the hyperbolic tangent of the input sample x. This is what adds odd harmonics. If you use a pure sine wave as input signal (blue), turning up the Input Trim pushes it harder until the sine wave becomes a square wave (orange).
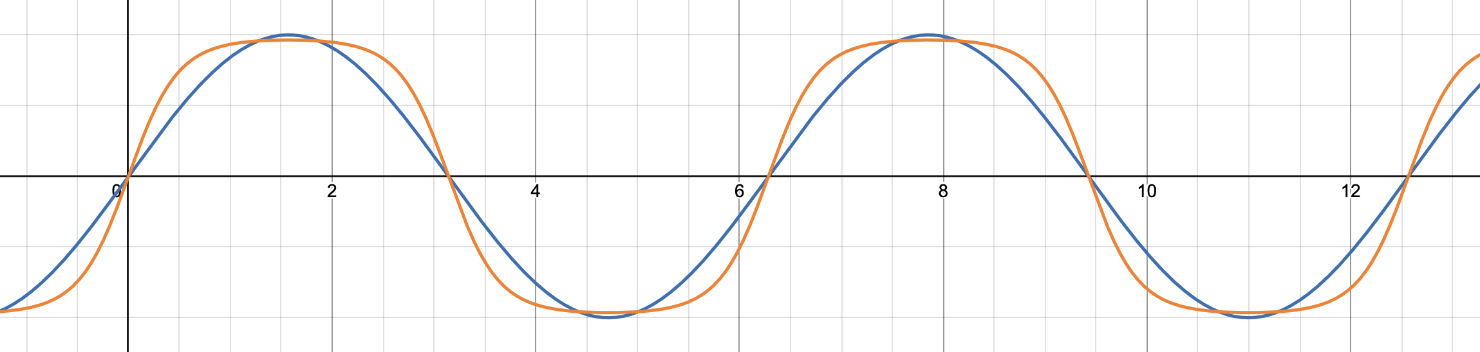
Note that this waveshaper is always active. Even with the Input Trim knob set to its default value of 0 dB, saturation is already being applied. To not have any saturation, you’ll have to dial back the knob all the way. And even then it’s not completely gone — there are always a few harmonics being added.
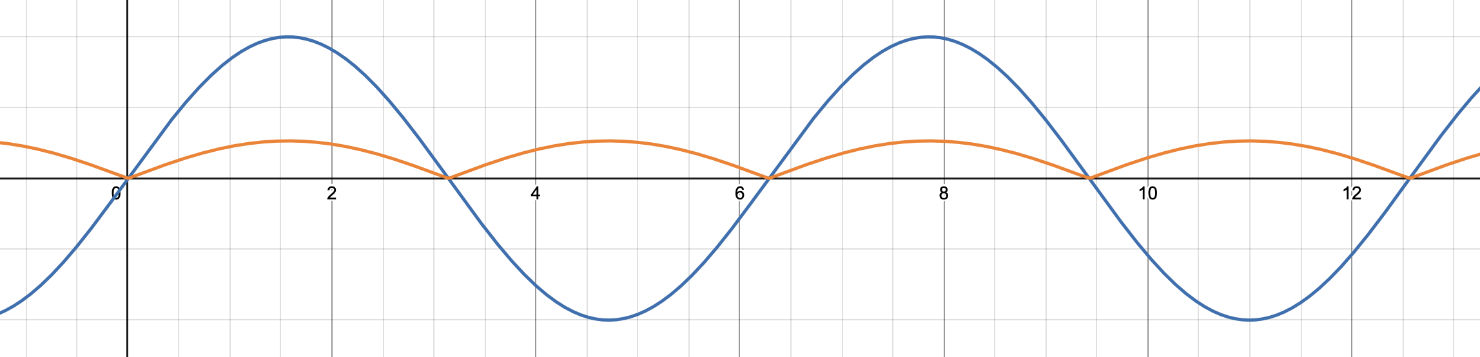
The even harmonics are added in the method processEvenHarmonicWaveshaping(), which applies the following waveshaper:
y = tanh(0.272f * abs(x))
Very similar but the output sample y is always positive now. This effect is quite extreme, which is why when the signals are mixed together, the even harmonics are gained down.
Finally, the InputSaturation applies a gentle first-order low-pass filter set at 4 kHz to roll off the high end a bit, modeling high frequency losses.
The plug-in does not do any oversampling, so this input saturation stage creates lots of aliases. This is easy to hear if you use a sine wave sweep as the input signal and dial up the Input Trim. With no aliases, the tone should only rise, but you’ll also hear the pitch go own, meaning some serious aliasing is going on.
Note: One thing that is problematic in the version of the code I was given, is things like filter coefficients are calculated assuming the sample rate is 44100 Hz. A modern plug-in should be able to handle other sampling rates. Rather than computing the filter coefficient just once in the InputSaturation constructor, it would be better to do this in a prepareToPlay(sampleRate) function. In addition, the filter state is never reset to zero when playing resumes, so the class also needs a reset() function. At the time of writing this blog post, I did not fix the plug-in to make it independent of the sample rate yet.
Flanging
A cool feature of The Kiss of Shame is the big spinning tape reels at the top. These are not just for show, although you can hide them if they take up too much space. Dragging up or down on the reels enables a flanging effect while visually slowing down the animation.

I’ve never done flanging myself using a real tape machine (maybe when I was a kid on my dad’s reel-to-reel), but from what I understand you literally press down your finger on the rim of the reel to slow it down, so this is kind of a natural thing to do in the plug-in as well.
The typical way to implement flanging using DSP is to read from a short delay line, usually with an LFO, and add the delayed sample to the original sound. Essentially it creates a comb filter that varies in time. In TKOS there is no LFO: the delay length is set by how far you drag on the reels. Your “finger” is the LFO.
In the original plug-in, dragging the reels sent an "updateFlange" JUCE action message to the AudioGraph to set the flange depth, but I replaced this by a proper plug-in parameter named Flange. This way it can also be automated from the host.
The code in the Flange class is fairly straightforward. It allocates a new AudioBuffer that will act as a circular buffer for the delay line. On every timestep, it first pushes the input sample into the delay line, and then uses linear interpolation to read the delayed sample. This is mixed with the original input sample and written to the output buffer.
The length of the delay is set by the Flange parameter and ranges from 0 to 1000 samples. Unfortunately, the fact that it’s expressed as a length in samples makes the effect depend on the sample rate. It would have been better to specify this in milliseconds (between 0 and 20 ms perhaps).
As mentioned, there is no parameter smoothing in this plug-in. However, the delay length for the flange effect is smoothed using a one-pole filter. No zipper noise here!
Note: I had expected the flange effect to return to zero delay upon mouse up — since the reel animation resumes its normal speed when you stop dragging — but it doesn’t. Since I’ve never done any analog flanging myself, I couldn’t say which approach makes the most sense.
Hiss
The Hiss class adds a subtle noise layer to the sound. This loads the waveform Hiss.wav into an AudioBuffer.
The code in processHiss() continously loops through this waveform and mixes it into the wet signal. The level depends on the setting of the Hiss knob but is quite low, at most –46 dB. The original signal is reduced by the same amount to keep the output level the same.
As you can see in the image, the waveform fades in at the beginning and fades out at the end. To prevent these tapers from being audible, processHiss() reads the waveform at two locations that are half a waveform length apart and crossfades between these two samples to get a seamless loop.
The original plug-in loaded Hiss.wav from a file, but for convenience I placed it into the plug-in’s BinaryData. The audio file is rather large (almost 13 MB) and lasts over a minute. That’s a lot of hissing! To reduce the size of the plug-in, it may have been better to trim this audio file down but I wanted to stay true to the original.
The sample rate of Hiss.wav is 44100 Hz. The code does not resample this to the actual sample rate of the project. This is fine for 48 kHz but at higher rates the noise sounds like it has a tone in it. So that’s an improvement that could be made to the code.
Shame
The Shame knob is the big one in the center. According to the plug-in’s orginal description, this knob recreates factors like Drift, Wow, Flutter and Scrape-Flutter. I’m not an expert on tape machines but it definitely will totally mangle the sound when turned up fully! Let’s see how it works.
The Shame class has several internal properties — depth, rate, randPeriodicity — that are all set by this single knob. The further the Shame knob is turned, the more extreme they will be. This happens in the function setInterpolatedParameters().
There is a variable waveformIndx, which is a floating-point number. In theory, this can be used to interpolate between several different wavetables. The Shame class allocates four AudioBuffer objects, one for each wavetable. Strangely, it fills each buffer with the exact same waveform, a single cycle cosine at a frequency of 1 Hz (i.e. it’s 44100 samples long).

I’m guessing at some point the idea was to morph between wavetables containing different single-cycle waveforms. In fact, the original code came with a few audio files just like that, so perhaps they were intended to be loaded into these wavetables. In any case, the waveformIndx variable is only ever 0.0f, and therefore the wavetable interpolation logic in this class is never being used — it always only reads from the first wavetable. Oh well.
The single-cycle cosine from the wavetable acts as a unipolar LFO that is used to modulate a delay line. This is very similar to the Flange class, except there the delay length was set by the position of the user’s “finger” on the spinning reels, while here the delay length is constantly being modulated.
The code in processShame() is therefore very similar to processFlange(). It first writes the new input sample into the delay line and then reads from the delay line at some time in the past. However, the delayed sample is not added to the input sample now. We just want to have a time-varying delay, not another comb filter.
Modulating the delay length is done as follows:
playPosition = float(curPos) + depth*processWavetable();
Here, curPos is the index where we most recently wrote into the delay line’s circular buffer. The depth variable is set in setInterpolatedParameters() and is the maximum possible delay length. The more you turn up the Shame knob, the larger depth will be. It varies between 0 and 60 samples, which is a pretty short delay. (Again, the fact that samples are used rather than milliseconds makes this effect only work as intended at 44.1 kHz.)
The processWavetable() function reads the next LFO value from the wavetable, using linear interpolation, and returns a value between –1.0 and 0. It actually reads at the same position from two wavetables and then blends these based on waveformIndx, but as explained this has no effect right now since all wavetables contain the exact same thing and waveformIndx is always zero.
To step through the wavetable, processWavetable() uses the following logic:
curPos_wTable = curPos_wTable + rate + rateFluctuation;
Here, curPos_wTable is the read index in the wavetable. On every timestep, this position is incremented by rate. The more the Shame knob is turned, the larger rate is (between 7 and 77 samples), although rate does decrease again once Shame gets closer to 100%. Since the wavetable stores a 1 Hz version of the LFO’s waveform, stepping through it at rate of 77 samples means the LFO runs at 77 Hz max.
The rateFluctuation variable adds a bit of randomness to the LFO rate. When it reaches the end of the wavetable, processWavetable() does:
if (curPos_wTable >= BUFFER_SIZE) {
    float random = float(rand() % 2000)/1000.0f - 1.0f;
    rateFluctuation = random * rate * randPeriodicity;
    curPos_wTable -= BUFFER_SIZE;
}
This calculates a new random number between –1 and +1 and from this it derives the new rateFluctuation. The randPeriodicity value is also based on the position of the Shame knob. More shame, more randomness. So, the LFO that modulates the delay length doesn’t oscillate at a fixed speed; after it completes a cycle, it will somewhat randomly determine the speed of the next cycle.
If we visualize the output of the LFO, i.e. what processWavetable() calculates, it looks like the following. Every cycle has a different length. These variations become more extreme the more you turn up the Shame knob. It really does “wow and flutter”!

To summarize: the Shame effect is just a delay line with a (relatively short) delay length that is modulated by a unipolar cosine wave that randomly changes its period. In theory this could morph from the cosine to different waveforms but that’s only half implemented.
It’s often enlightening to see what happens when you feed a pure sine wave into an effect like this. When I first tried a 220 Hz sine, I only started hearing something after I pushed the Shame knob past 50%, and I wondered if the code was broken somehow. However, with a 10 kHz sine the effect was obvious much earlier. The 220 Hz sine wave moves slower, so a small delay doesn’t make much of a difference there. Conclusion: always test with a bunch of different frequencies.
Note: The code uses rand() a lot for calculating random numbers or white noise. As I’ve explained before, this function should not be used in audio code — or in any code, really. It would be better to switch to juce::Random.
Hurricane Sandy
The user can choose from a few different environments that simulate the conditions the tape was stored in:
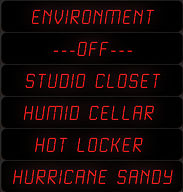
These all sound very exciting but unfortunately we only have code for the Hurricane Sandy environment. HurricaneSandy is the most complex piece of DSP code in this plug-in and it was quite fun to figure out how it worked.
The processHurricaneSandy() function does the following in order:
- Low-pass filter the input signal.
- Mix periodic bursts of white noise into the signal.
- Modulate the amplitude of the signal using grains of pink noise.
- Calculate slow amplitude fluctuations and apply these to the signal.
- Mix a low-frequency noise waveform into the sound.
Phew, that’s a lot of stuff.
There’s only a single knob, Age, that will determine how extreme each of these steps is. The function setInterpolatedParameters() takes the parameter value and uses that to calculate various private variables.
For example, the cutoff frequency of the low-pass filter is set using the code:
lpButterworth_Signal.setButterworth_LowHighPass(20050.0f*(1.0f - input) + 2000.0f, true);
Here, input is the value of the Age parameter (0.0 - 1.0). When the knob is turned off, the cutoff frequency is 22050 Hz, disabling the filter. With Age all the way up, the cutoff point is 2000 Hz. The filter is a 2nd order Butterworth, which means it doesn’t resonate.
The filter is an instance of class Biquads. This uses a Direct Form I implementation of a biquadratic filter, which is not ideal for floating-point. It would be better to replace this with a more modern filter structure such as the Cytomic SVF or Zavalishin’s TPT filters.
To mix periodic bursts of white noise into the signal, an envelope generator is used. Class Envelope implements a rudimentary MSEG (multiple segment envelope generator). It has a list of points that get stretched to a given duration, which is always 350 milliseconds in this plug-in. At every timestep, processEnvelope() figures out in between which two points it is and outputs a linearly interpolated value. After the last point, it wraps around and starts a new envelope.
If we plot this envelope it looks like this:

As you can see it just creates a little “blip” every so often. The blip is a triangular-ish shape that ends after about 150 ms, so there’s 200 ms of silence between these peaks. To output the noise burst, the code does:
float noiseBurst = signalEnvValue*samples[i] + 0.05f*noiseBurstEnvValue*whiteNoise.tick();
samples[i] = (1.0f - noiseBurstImpact)*samples[i] + noiseBurstImpact*noiseBurst;
Here, noiseBurstEnvValue is the output from the envelope generator. signalEnvValue is its opposite, so if the envelope value is 0.8, signalEnvValue is 0.2. This means the original signal gets ducked when the noise burst plays.
The whiteNoise variable is an instance of Noise, a very simple white noise generator that just calculates a random number between –1.0 and 1.0. The noiseBurstImpact variable is derived from the setting of the Age knob. For low settings of the knob, the noise bursts are disabled.
Next up, there are two amplitude modulations. First, it does this:
float grainSample = granulator.tick();
grainSample = lpButterworth_Grains.process(grainSample, 0);
grainSample = hpButterworth_Grains.process(grainSample, 0);

samples[i] *= 1.0f - grainImpact*grainSample;
The granulator variable is an object of type Granulate. This reads random grains from an audio file, PinkNoise.wav. There are always 10 grains, but the more Age knob is turned up, the longer the grains are and the shorter the pauses between them.
Here’s what the grains look like by themselves:

The grains are short snippets of pink noise that get subsequently filtered by a low-pass filter at 2 kHz and a high-pass filter at 50 Hz. So they’re actually much darker noise that sounds like scratches on an old vinyl record — or old tape, I suppose.
We don’t simply add these grains to the output, but use them to modulate the amplitude of the signal using what is essentially ring modulation. The grainImpact variable determines how extreme this modulation is, and you guessed it, is set by the Age knob.
The Granulate class was taken from the STK library but tweaked to work with JUCE’s AudioBuffer. Like much of the other DSP code in this plug-in, it assumes a fixed sampling rate of 44.1 kHz.
The second amplitude modulation uses another envelope generator, EnvelopeDips. Unlike Envelope, which consists of a fixed set of points, EnvelopeDips outputs a random set of points that look like this:

This basically creates a randomized tremolo effect. The modulation is applied as follows:
samples[i] = ampFluctuationImpact * dipsLevel * samples[i]
              + (1.0f - ampFluctuationImpact) * samples[i];
Here, dipsLevel is the output from the EnvelopeDips object and ampFluctuationImpact is set by the Age knob.
Finally, we mix some pretty cool rumbling sounds from the file LowLevelGrainNoise.wav into the signal. This uses the class LoopCrossfade, which in essence does the same thing as the Hiss class: it seamlessly loops through the prerecorded waveform.
float lfGrainSample = lowFreqGranular.processLoopCrossSample(0);
samples[i] = samples[i] + lowFreqGrainNoiseLevel*lfGrainSample;
Putting it all together, the Hurricane Sandy effect adds different kinds of noise into the signal — some random, some periodic — and also randomly fluctuates the amplitude using both high frequency and low frequency modulations. It does really sound messed up when Age is dialed to the max!
When applied to a steady sine wave, the tremolo and noise burst ducking sound quite extreme. But on actual program material the effect is less obnoxious and you can really crank it up.
The user interface
The UI is a pretty standard PluginEditor implementation. I used ParameterAttachment objects to hook up the knobs and buttons to the plug-in parameters.
The face of the tape machine consists of two images: one with the reels and one without. Double-clicking on the background toggles between the two states.
The Face.png image you’re seeing here has holes cut out for where the knobs and buttons go. I think these were all 3D rendered and then exported as filmstrips.
The knobs are a juce::Slider subclass that overides paint() to draw a knob image from a filmstrip. This code might predate JUCE’s look-and-feel system, but in any case it doesn’t use it. Likewise, the buttons are a subclass of juce::ImageButton.
The editor places a BacklightComponent behind everything. This component simply draws a solid pink color. This is the same pink that you see on the knobs. In fact, the track portion of the knobs is see-through, so that this color comes from the BacklightComponent, not from the knob image. This was done so that the pink’s brightness could be modulated by the sound level. The code for this still exists in the editor but was commented out — I can understand why, it gets a bit much.
When audio is playing, the reelAnimation component is made visible and placed on top of the existing reels. The class for this derives from juce::AnimatedAppComponent and simply displays the next frame from the Wheels.png filmstrip whenever a timer fires. Dragging the mouse to get the flanging effect slows down this animation to give the sensation you’re really pressing down on the reels with your finger. For optimal drawing performance, the animation is attached to an OpenGLContext.
The VU meters also draw from a filmstrip image. The audio processor measures the RMS for the left and right channels over every block. The editor reads these values in a timer callback and uses them to change the image on the VU meter components. Pretty much all drawing in this plug-in is done using images and filmstrips.
Note: In the original plug-in, the image and sound files were in a separate folder that you had to copy to a specific location on your drive. I decided to stick all those files into the plug-in’s binary using JUCE’s BinaryData feature. This makes the plug-in much easier to install (just one file) but the downside is that on Mac the download is four times larger than on Windows, since there are two plug-in versions (VST3 and AU) and each contains two copies of the binary (for Intel and ARM). The image and sound resources are therefore copied four times, which is a little wasteful. Trade-offs.
The future?
The goal of my plug-in archeology work is to preserve older audio plug-ins and keep them functioning, by rewriting them in a more modern API such as JUCE or perhaps even Cmajor, as well as documenting how they work so we can learn from them. I typically don’t spend a lot of time improving the plug-ins. Any flaws they have are part of the charm.
That said, The Kiss of Shame was never completely finished and so I don’t feel like I’m being untrue to the original by adding the missing bits and fixing the issues. Here are some things that can still be improved:
- Don’t hardcode the sample rate to 44100 Hz.
- Add
prepareToPlay()andreset()methods to the DSP classes. - Replace the biquads with TPT / SVF filters.
- Replace
rand()withjuce::Random. - Parameter smoothing.
- Use oversampling on the saturation stage.
- …and more…
See the GitHub repo for more details. Maybe by the time you read this, some of these issues will have already been fixed. 😅
I doubt that I’ll be adding missing functionality such as the tape type selector — I have no idea what the difference is between S-111 and A-456 tape — or print-through or the other environments. But maybe some other volunteer is interested? The project is open source after all!